Quick Start
Planning an evaluation? Review the prerequisites and evaluation plan before installing.
For local development and testing without a cloud cluster, use proxymock to run a local mock server and generate tests from your traffic. Follow Install proxymock CLI and the proxymock CLI quickstart. For help choosing between proxymock and speedctl, see Command-line tools.
- Local-first: proxymock keeps recording local by default for desktop workflows. See Data and Privacy.
- Enterprise isolation: use Bring Your Own Cloud (BYOC) when data residency and cloud boundary control are required.
- Sensitive data controls: enable DLP so sensitive fields are redacted before data leaves your network.
This guide walks through installing Speedscale into a Kubernetes (cloud or on-prem) environment. After completing these steps the Speedscale Operator will be installed in your cluster and you should continue on to the tutorial to record, replay and view results for a demo application.
For standard Kubernetes traffic collection, follow Kubernetes capture with eBPF and Java Agent. Use goproxy sidecars only for an existing deployment or when your environment does not meet the eBPF requirements.
Speedscale is tested with apps hosted on the local desktop all the way up to high scale enterprise Kubernetes clusters. Keep in mind that it is very common to record traffic in one environment (like a production Kubernetes cluster) and replay it somewhere else (like a local mock server).
Install with your coding agent (recommended)
This platform install deliberately installs both speedctl and proxymock. For proxymock alone without cluster setup, use the proxymock-only agent install.
Let your coding agent (Claude Code, Cursor, Codex, Gemini CLI, Kiro, or any assistant that can read a URL and run commands) do the whole install. Paste this into the chat:
Install Speedscale for me. First fetch the agent skill at
https://raw.githubusercontent.com/speedscale/skills/main/skills/install-speedscale/SKILL.md
and the references/ and scripts/ files it links to (same base URL), save them
under your skills directory, then follow the skill. Ask me before touching a
Kubernetes cluster.
The install-speedscale skill follows the same steps as the manual install below. It installs speedctl and proxymock, adds Helm and kubectl if they are missing, sets up your API key without ever printing it, and picks Helm values for your platform (EKS, GKE, AKS, minikube, kind, OpenShift). Then it verifies the operator and, only for the agent you select, offers to add the proxymock MCP server and bundled skills after previewing the paths. The agent announces every step that changes something before running it. It stops for you at browser sign-in and before touching a cluster whose name looks like production. With no cluster available, it installs just the CLIs.
Already have proxymock? proxymock mcp install --client claude-code --skills offers MCP and bundled skills for that selected client, preferring project scope. Add --dry-run to preview paths. You can also add it as a Claude Code plugin with /plugin marketplace add speedscale/skills then /plugin install speedscale@speedscale-skills, as a Codex plugin with codex plugin marketplace add speedscale/skills then codex plugin add speedscale@speedscale-skills, or add it to other agents with npx skills add speedscale/skills.
See Agent skills for the other skills.
Prefer to install manually?
Follow the standard operator installation for the full procedure, then return here to start the tutorial. If cluster policy prevents cluster-scoped grants, choose the namespace-scoped installation instead. Compare both paths in Kubernetes installation options.
Install speedctl CLI (optional)
These instructions install speedctl for platform setup and cloud resource automation. For the proxymock record/mock/replay workflow, follow Install proxymock CLI.
- MacOS
- Linux
- Windows
Install speedctl on macOS with Homebrew:
brew install speedscale/tap/speedctl
Or via the install script:
sh -c "$(curl -Lfs https://downloads.speedscale.com/speedctl/install)"
You can inspect the install script to see what it does. Root permission is not required to execute this script.
Install a specific version by passing it to the install script:
sh -c "$(curl -Lfs https://downloads.speedscale.com/speedctl/install)" -s v2.3.86
To install non interactively (like in CI/CD) set the SPEEDSCALE_API_KEY environment variable to your API key
Optionally skip the install script and install manually:
# Download speedctl binary on your machine
curl "https://downloads.speedscale.com/speedctl/speedctl-darwin-$(case $(uname -m) in x86_64) echo 'amd64';; arm | arm64 | aarch64) echo 'arm64';; esac)" -o speedctl

# Create speedscale directory and move the binary to the directory
mkdir ~/.speedscale
mv ./speedctl ~/.speedscale

# Give execute permission to the binary
chmod +x ~/.speedscale/speedctl
Don't forget to add speedctl to your $PATH variable in your shell's rcfile:
# substitute your shell's rcfile
echo "export PATH=\$PATH:$HOME/.speedscale" >> ~/.zshrc
Install speedctl on Linux with the install script:
sh -c "$(curl -Lfs https://downloads.speedscale.com/speedctl/install)"
You can inspect the install script to see what it does. Root permission is not required to execute this script.
Install a specific version by passing it to the install script:
sh -c "$(curl -Lfs https://downloads.speedscale.com/speedctl/install)" -s v2.3.86
To install non interactively (like in CI/CD) set the SPEEDSCALE_API_KEY environment variable to your API key
Optionally skip the install script and install manually:
# Download speedctl binary on your machine
curl "https://downloads.speedscale.com/speedctl/speedctl-linux-$(case $(uname -m) in x86_64) echo 'amd64';; arm | arm64 | aarch64) echo 'arm64';; esac)" -o speedctl

# Create speedscale directory and move the binary to the directory
mkdir ~/.speedscale
mv ./speedctl ~/.speedscale

# Give execute permission to the binary
chmod +x ~/.speedscale/speedctl
Don't forget to add speedctl to your $PATH variable in your shell's rcfile:
# substitute your shell's rcfile
echo "export PATH=\$PATH:$HOME/.speedscale" >> ~/.zshrc
Open PowerShell and create a Speedscale directory.
mkdir -f $env:userprofile\.speedscale
Download speedctl into the Speedscale directory.
curl.exe -L "https://downloads.speedscale.com/speedctl/speedctl.exe" -o $env:userprofile\.speedscale\speedctl.exe
If this is your first time using speedctl you may need to add the Speedscale
directory to your Path environment variable so it is accessible without knowing
the full path.
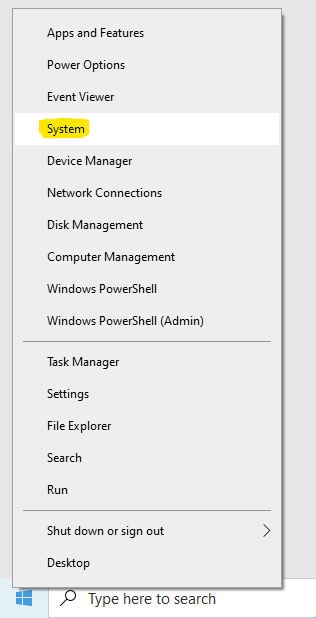
To add the Speedscale directory to your path, right click on the Windows button and click System.
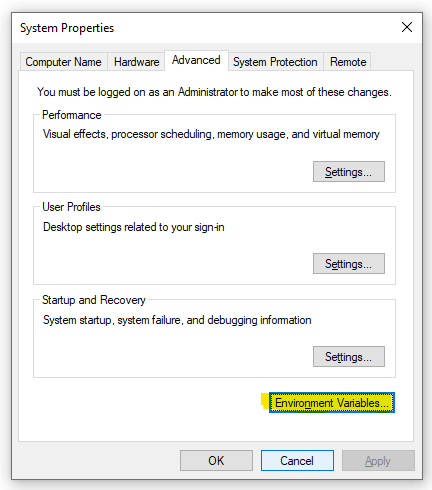
Click Advanced system settings on the right.

Click Environment Variables.
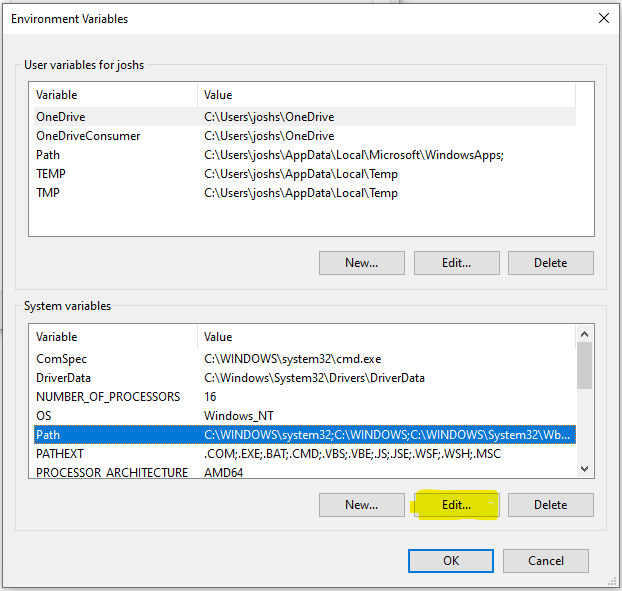
Under System variables select Path and click Edit.
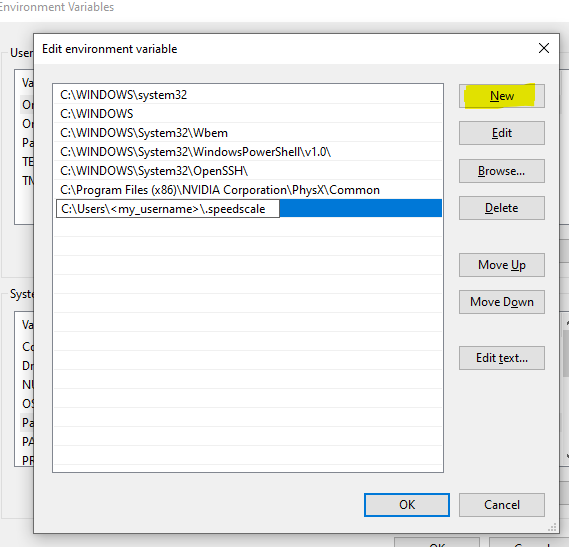
Create a New entry in the list with the Speedscale directory. If you are unsure of the exact path run this command from PowerShell.
echo $env:userprofile\.speedscale
Click OK and restart PowerShell.
Install Speedscale Operator (optional)
Use a service account API key from Tenant Settings, then choose Helm, speedctl, Argo CD, or rendered manifests in the operator guide. Review platform requirements before installing on a specialized Kubernetes platform. For private registries, see image pull secrets and private registry images. Follow Verify installation before proceeding to the tutorial.
Next Steps
For the proxymock CLI path, continue with cluster capture and replay commands. If proxymock is not installed yet, install it first; the platform agent install already installs it.
At this point Speedscale is present in your cluster and you are now ready to target workloads for record and playback. If this is your first installation please continue using our multi-platform tutorial for a full walkthrough.
If you're already an expert you can click the Add Service button in the UI to target workloads for capture. Follow Kubernetes capture with eBPF and Java Agent to configure and verify capture. If your environment cannot run eBPF, use the sidecar fallback.