Speedscale on the CLI
In this guide we will use speedctl to capture traffic, run a replay, and create local mocks, all from the command line.
Prerequisites
- speedctl installed
- an existing snapshot
- an understanding of Speedscale TLS certificate trust
Capture Traffic
speedctl capture is not natively supported on Windows. Use
WSL to get capture support.
In order to capture traffic from your application all inbound and outbound traffic will need to be routed through the Speedscale proxy.
The traffic flow will look should look something like this:

The Speedscale components are in orange and your components are in green.
The curl HTTP client is used to make a request directly to the Speedscale proxy which forwards that request to your app, capturing the inbound request. Your app handles the inbound request and makes a database query to Postgres. The outbound query is routed through the Speedscale proxy where the data is captured, and since the responses follow the same path in reverse they are captured as well.
We will need 3 terminal windows for this example.
Terminal 1
Run speedctl capture with the name of your application and the port it is
serving on, 9000 in this example. This starts the Speedscale proxy.
speedctl capture a_name_for_my_app 9000
Terminal 2
Set proxy variables to redirect outbound traffic to the Speedscale proxy and start your server.
export http_proxy=http://127.0.0.1:4140
export https_proxy=http://127.0.0.1:4140
./my_app
Terminal 3
Make requests to your app, targeting the proxy instead of your server directly.
curl http://127.0.0.1:4143/foo/bar
After about a minute your application should show up in the services list at https://app.speedscale.com.
Run a Replay
Once you have captured traffic you can create a snapshot and replay it against your app.
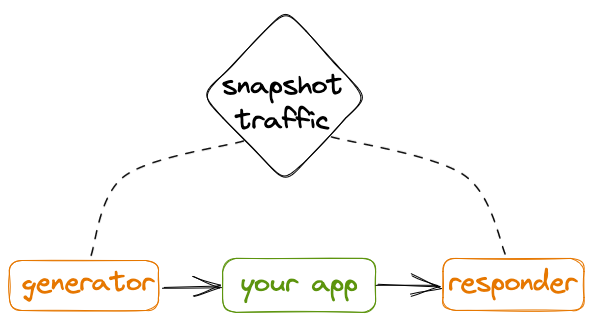
The captured traffic is loaded into Speedscale components before the replay starts. The generator makes requests to the your app and the responder mocks external resources.
We will need 2 terminal windows for this example.
Terminal 1
Set proxy variables to redirect outbound traffic to the Speedscale responder and start your server.
export http_proxy=http://localhost:4140
export http_proxys=https://localhost:4140
./my_app
This ensures your application's outbound requests are routed to the responder.
Terminal 2
Run speedctl replay with the snapshot ID. The snapshot ID can be copied by
clicking the three dots in the top right corner of the screen when viewing a
snapshot. Snapshots are listed on the
snapshots page.
The example here runs a replay with the traffic from the snapshot with ID
310457d7-b17a-4802-897c-ac98004dab21, using the test config
standard-passthrough, and targeting a local application serving traffic on
port 8081.
speedctl replay 310457d7-b17a-4802-897c-ac98004dab21 \
  --test-config-id=standard-passthrough \
  --custom-url='http://localhost:8081'
The --custom-url flag overrides the URL for each replay request. See custom URL configuration for more information.
This command will run both the generator and the responder in the same terminal window and your app should receive all requests from the snapshot.
With --daemon flag, You can run generator and responder as a background process.
Create Local Mocks
Local mocks are just another replay with no generator.
We will need 2 terminal windows for this example.
Terminal 1
Just as with the replay, set proxy variables to redirect outbound traffic to the Speedscale responder and start your server.
export http_proxy=http://localhost:4140
export http_proxys=https://localhost:4140
./my_app
This ensures your application's outbound requests are routed to the responder.
Terminal 2
Run speedctl replay, but this time with the flag --mode=mocks-only. This
will only run the responder, allowing your app to make outbound requests that
respond with data from the snapshot.
Now you can test your application with predictable data. Outbound requests will be routed to the responder and your app will receive mocked responses from snapshot traffic.