CI/CD
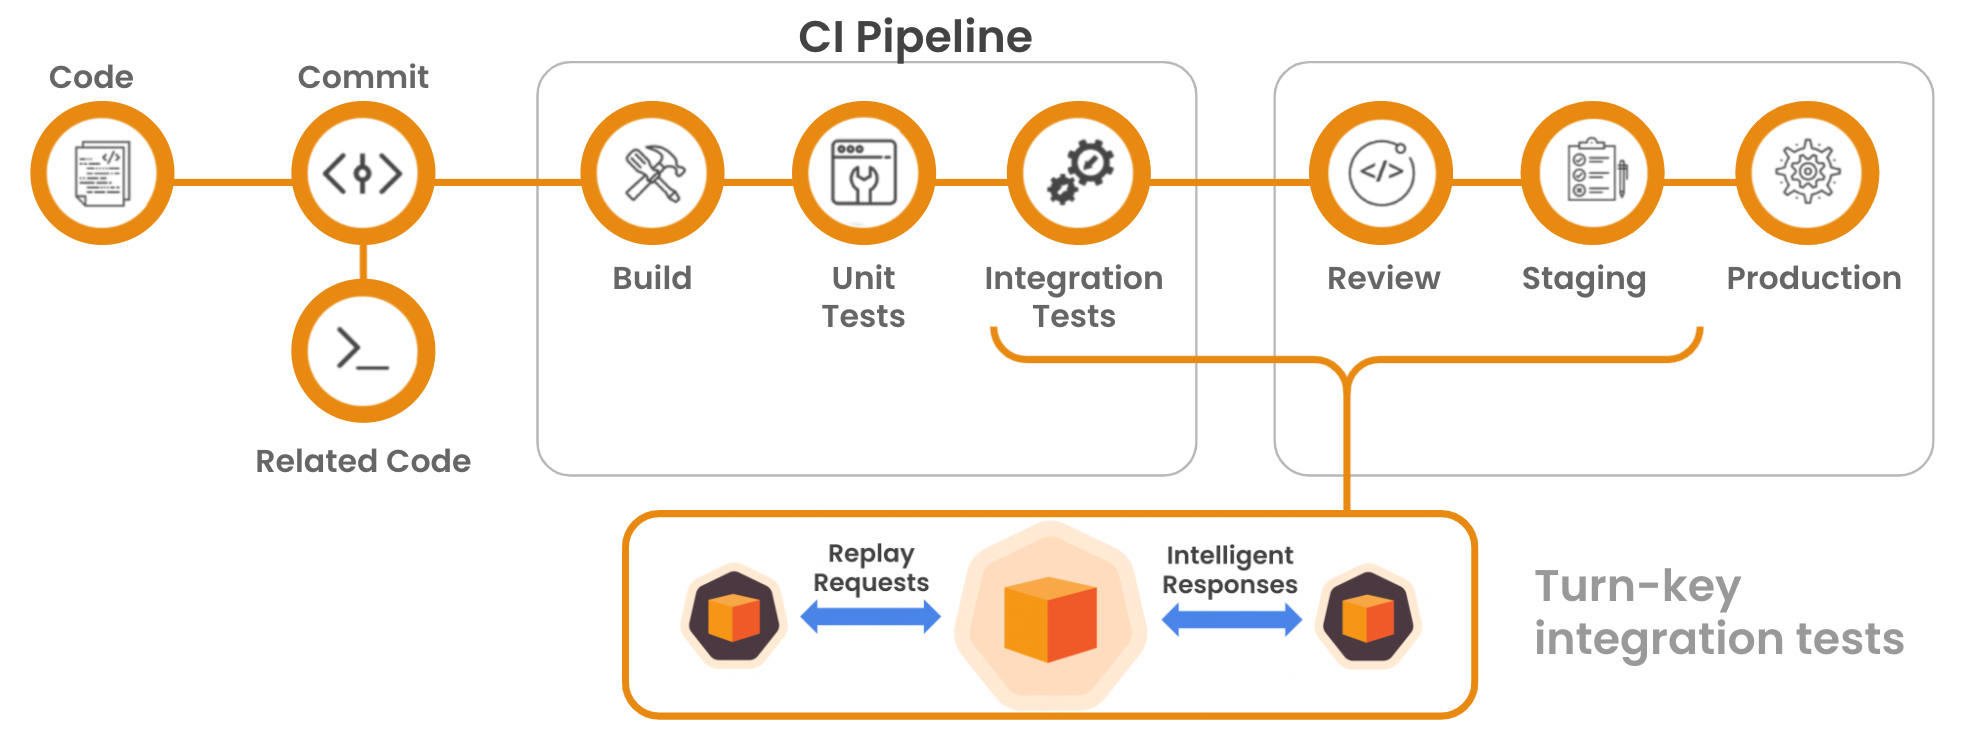
Integrate proxymock into your CI/CD workflow to enable high-velocity deployment with confidence.
Run proxymock after your build and unit tests, but before deploying to production.
Adding anything to your CI/CD pipeline generally involves the same 3 steps:
- Adding a step to your pipeline (see #1. The Pipeline)
- Executing the right script to perform a desired action (see #2. The Script)
- Authentication (see #3. The API Key)
Prerequisites
In order to integrate proxymock into your CI/CD you will need:
- Access to modify your CI/CD pipeline
- Your proxymock API key
- A paid proxymock account (see proxymock.io for pricing details)
- Pre-recorded traffic files (see recording to record from your app)
1. The Pipeline
These pipeline examples contain the minimal configuration needed to run proxymock with your application.
Examples build a Go binary using go build using the golang container image.
Your image can be anything you choose as long as proxymock has access to
your application.
- GitHub
- GitLab
- Jenkins
- Azure DevOps
- Google Cloud Deploy with Skaffold
- AWS CodeBuild
- Bitbucket Pipelines
- TeamCity
- CircleCI
name: CI with proxymock
on:
  push:
    branches:
      - main
  pull_request:
    branches:
      - main

jobs:
  test:
    runs-on: ubuntu-latest
    container: golang:1.25
    steps:
      - name: Checkout
        uses: actions/checkout@v4

      - name: Build and test with proxymock
        run: |
          go build -o myapp .
          ./proxymock.sh # <--- proxymock script - see below
stages:
  - build

# build Go application and test with proxymock
build:
  stage: build
  image: golang:1.25
  script:
    - go build -o myapp .
    - ./proxymock.sh # <--- proxymock script - see below
#!groovy

pipeline {
  agent {
    docker { image 'golang:1.25' }
  }
  stages {
    stage('Build and Test') {
      steps {
        sh 'go build -o myapp .'
        sh './proxymock.sh' // <--- proxymock script - see below
      }
    }
  }
  post{
    success{
      echo "======== pipeline executed successfully ========"
    }
    failure{
      echo "======== pipeline execution failed ========"
    }
  }
}
trigger:
  - main

pool:
  vmImage: "ubuntu-latest"

container: golang:1.25

steps:
  - script: |
      go build -o myapp .
      ./proxymock.sh # <--- proxymock script - see below
    displayName: 'Build and test with proxymock'
Add the verify block to your existing Skaffold deploy.
apiVersion: skaffold/v4beta13
kind: Config
manifests:
  rawYaml:
    - k8s-deploy.yaml
deploy:
  kubectl: {}
build:
  artifacts:
  - image: myapp
    docker:
      dockerfile: Dockerfile
verify:
  - name: speedscale
    container:
      name: speedscale
      image: golang:1.25
      command: ["/bin/bash"]
      args: ["-c", "go build -o myapp . && ./proxymock.sh"] # <--- proxymock script - see below
See https://skaffold.dev/docs/references/yaml/ for spec details.
version: 0.2

phases:
  install:
    runtime-versions:
      golang: 1.25
  build:
    commands:
      - go build -o myapp .
      - ./proxymock.sh # <--- proxymock script - see below

artifacts:
  files:
    - myapp
image: golang:1.25

pipelines:
  default:
    - step:
        name: Build and test with proxymock
        script:
          - go build -o myapp .
          - ./proxymock.sh # <--- proxymock script - see below
import jetbrains.buildServer.configs.kotlin.*
import jetbrains.buildServer.configs.kotlin.buildSteps.script

object Build : BuildType({
    name = "Build and Test"

    requirements {
        contains("docker.server.version")
    }

    steps {
        script {
            name = "Build and test with proxymock"
            dockerImage = "golang:1.25"
            scriptContent = """
                go build -o myapp .
                ./proxymock.sh # <--- proxymock script - see below
            """.trimIndent()
        }
    }
})
version: 2.1

jobs:
  speedscale:
    docker:
      - image: "golang:1.25"
    steps:
      - checkout
      - run:
          name: Build Go application
          command: go build -o myapp .
      - run:
          name: Run proxymock tests
          command: ./proxymock.sh # <--- proxymock script - see below
See a full config.yml for more context.
2. The Script
Let's fill in the proxymock.sh script shown above. Be sure to customize the user settings at the top of the script.
The script expects the SPEEDSCALE_API_KEY environment variable to be set
(securely) for authentication. See The API Key.
#!/usr/bin/env bash

# set the port your application will listen on, where traffic will be replayed
APP_PORT=8080
# set the command to run your application.  ensure this command has all of the
# correct flags and that the environment has all of the configuration needed to
# run your application properly
APP_COMMAND="./my-example-app --log-level debug" # CHANGE ME!

# the path to pre-recorded proxymock traffic
PROXYMOCK_IN_DIR="proxymock"
# optionally, run mock server
RUN_MOCK_SERVER=true

###########################
### USER SETTINGS ABOVE ###
###    SCRIPT BELOW     ###
###########################

# log file paths
REPLAY_LOG_FILE="proxymock_replay.log"
APP_LOG_FILE="proxymock_app.log"
MOCK_LOG_FILE="proxymock_mock.log"

set -e
set -o pipefail 2>/dev/null || true

validate() {
  if [ -z "$SPEEDSCALE_API_KEY" ]; then
  	echo "ERROR: SPEEDSCALE_API_KEY environment variable is not set"
  	exit 1
  fi

  if [ ! -d "$PROXYMOCK_IN_DIR" ]; then
  	echo "ERROR: $PROXYMOCK_IN_DIR does not exist - make sure you have pre-recorded traffic to mock / replay"
  	exit 1
  fi
}

install_proxymock() {
  echo "Installing proxymock..."

  sh -c "$(curl -Lfs https://downloads.speedscale.com/proxymock/install-proxymock)"
  export PATH=${PATH}:${HOME}/.speedscale

  # initialize with API key
  proxymock init --api-key "$SPEEDSCALE_API_KEY"
}

run_mock_server() {
  echo "Starting mock server..."

  proxymock mock \
    --verbose \
    --in "$PROXYMOCK_IN_DIR/" \
    --log-to "$MOCK_LOG_FILE" &
}

run_replay() {
  print_logs() {
    if [ -f "$MOCK_LOG_FILE" ]; then
      echo "=== proxymock mock server logs ==="
      cat $MOCK_LOG_FILE
    fi
    echo "=== proxymock replay logs ==="
    cat $REPLAY_LOG_FILE
    if [ -f "$APP_LOG_FILE" ]; then
      echo "=== application logs ==="
      cat $APP_LOG_FILE
    fi
  }
  trap print_logs EXIT

  # start proxymock replay, with your app, to run your app and replay test traffic
  # against it
  proxymock replay \
    --in "$PROXYMOCK_IN_DIR" \
    --test-against localhost:$APP_PORT \
    --log-to $REPLAY_LOG_FILE \
    --app-log-to $APP_LOG_FILE \
    --fail-if "latency.max > 1500" \
    -- $APP_COMMAND
}

main() {
  validate
  install_proxymock

  if [ "$RUN_MOCK_SERVER" = "true" ]; then
    run_mock_server
  fi

  run_replay
}

main
3. The API Key
proxymock requires a valid API key to run. Your API key is created when you
first run proxymock init and is stored in a config file, at
$HOME/.speedscale/config.yaml by default.
To make it easy, once registered you can get your API key directly with some command line magic:
SPEEDSCALE_CONFIG_FILE=$(proxymock version | grep 'Config File' | awk '{print $3}')
SPEEDSCALE_API_KEY=$(cat $SPEEDSCALE_CONFIG_FILE | grep apikey | awk '{print $2}')
echo $SPEEDSCALE_API_KEY
If this does not produce an API key make sure you are registered first with proxymock init.
Make SPEEDSCALE_API_KEY available to your pipeline as an environment variable
so proxymock can be initialized when the pipeline runs.
Need Help?
Let us know on the community Slack if instructions for your deploy system are not included here.