Quickstart (MCP)
This guide provides a step-by-step approach to creating a mock server and tests for a simple Go application using proxymock's MCP (Model Context Protocol) integration with AI coding assistants like Cursor, Claude, or GitHub Copilot.
Before you begin
Make sure you have:
- An AI coding assistant with MCP support (Cursor, Claude Code, GitHub Copilot, Cline, etc)
- A terminal or command prompt open
- go version 1.23.1 or newer installed
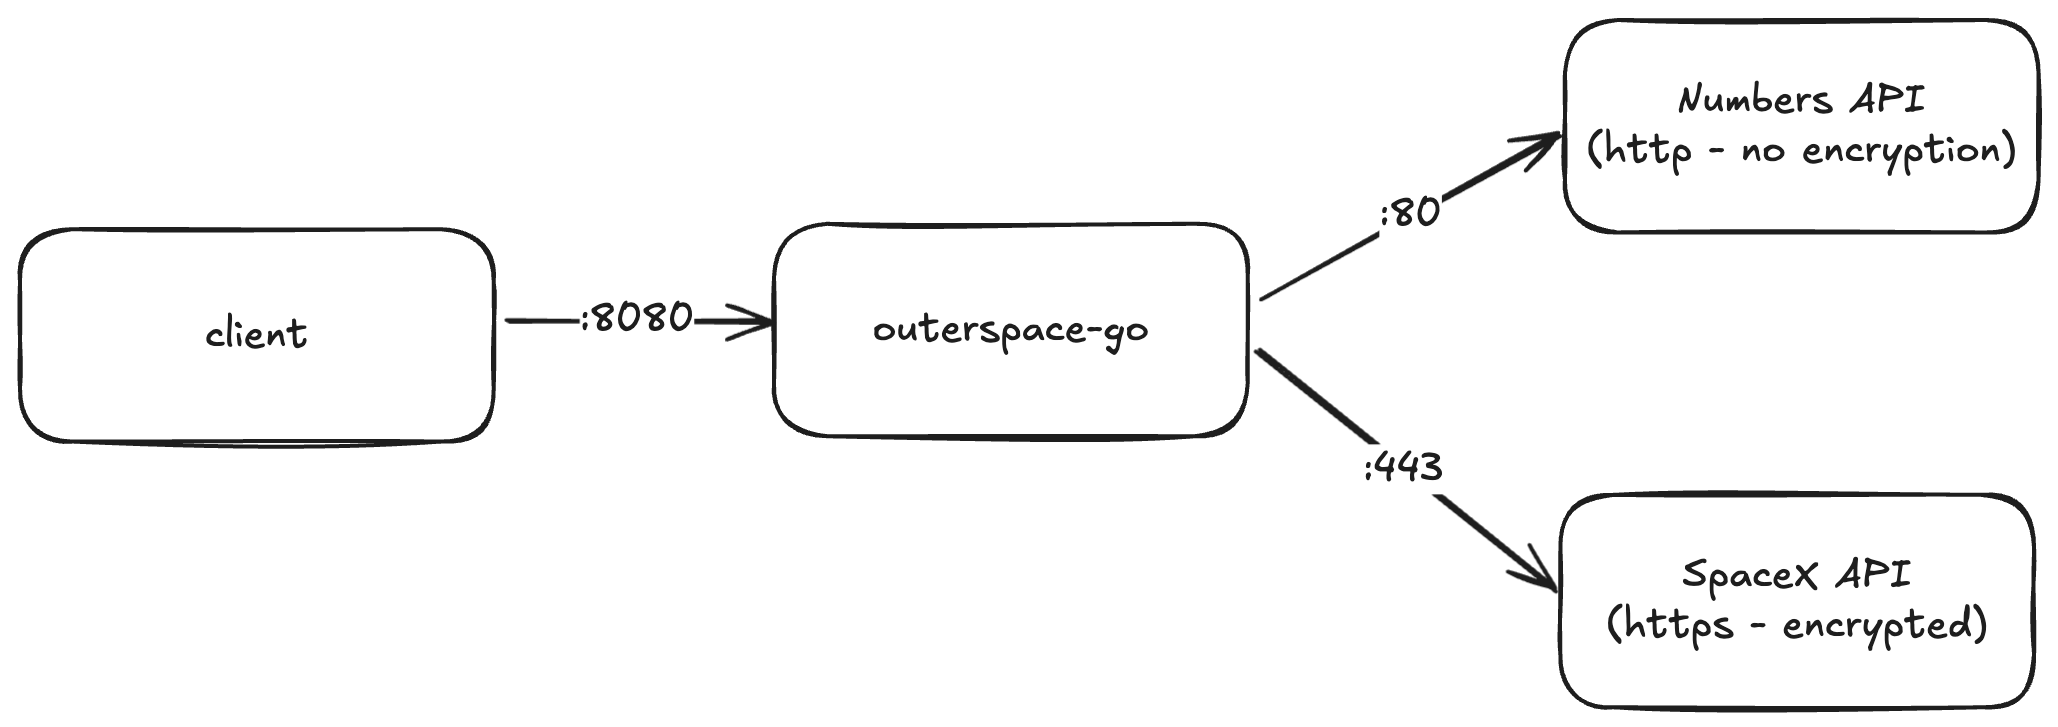
For this example we'll be using a simple demo app that accepts an API request, calls two downstream APIs and returns the results.
How MCP Works with proxymock
Instead of typing commands manually, you'll describe what you want to do in natural language. Your AI assistant will understand your intent and execute the appropriate proxymock commands through the MCP integration.
For example, instead of typing:
| CLI Command | AI Assistant Request |
|---|---|
| proxymock record | "Please create a traffic recording using proxymock" |
Step 1: Install proxymock
- macOS
- Linux
- Other (Detailed)
Install with Homebrew:
brew install speedscale/tap/proxymock
Run the install script:
sh -c "$(curl -Lfs https://downloads.speedscale.com/proxymock/install-proxymock)"
For other operating systems and more detailed instructions, see the installation instructions.
Need another OS like Windows or are you having issues? See advanced installation.
Open a terminal window and run the following command to obtain an API key:
proxymock init
Don't worry, we don't sell marketing data or give your email address to any bot nets.
This tutorial assumes you allow the MCP server configuration to be installed in Cursor, Claude Code, etc. If you do not answer Yes to these questions you need to add the MCP configuration manually.
Step 2: Install the demo app
- Cursor
- Claude Code
- Visual Studio Copilot
- Other
Open a chat session and instruct your AI assistant:
First, clone the git repository https://github.com/speedscale/outerspace-go. Next, open a new cursor window with only the outerspace-go directory in the workspace.
A new IDE window should open in the outerspace-go directory.
Open Claude Code from the command line and instruct your AI assistant:
First, clone the git repository https://github.com/speedscale/outerspace-go. Next, change your working directory to outerspace-go.
Claude will change its working directory to outerspace-go.
Visual Studio Copilot Agent-mode does not currently support direct git repository cloning. For the moment, it may be easier to run the CLI-based workflow.
If your LLM/IDE of choice supports Agent mode and can run commands like git directly then you can likely use the following prompt. Otherwise, check out the CLI-based demo.
First, clone the git repository https://github.com/speedscale/outerspace-go. Next, change your working directory to outerspace-go.
This should cause your chatbot to switch directories
Make sure your AI chatbot is in Agent mode. Running these commands in Ask (or similar) mode will not leave you with a smile on your face.
Step 3: Record traffic
Type this into your AI assistant's chat interface:
record traffic using proxymock
The LLM should take a series of steps:
- Start the proxymock recording
- Discover and run tests against the endpoint
- Investigate the proxymock logs
- Produce a new directory of recordings in a new directory
outerspace-go/proxymock/recorded-...
Ask your AI assistant:
"Show me the recorded traffic files"
Your AI assistant will point at the new directory of RRPairs and produce a summary. Your summary may look something like this (depending on which LLM you use):
📊 Traffic Summary:
Total files: 14 RRPair files
Inbound requests: 10 (to your application)
Outbound requests: 4 (to external APIs)
External APIs called: SpaceX API (3 calls), Numbers API (1 call)
Response times: 1ms to 690ms
These files can now be used for:
Mocking: Create a mock server with these responses
Replay testing: Test your application against recorded traffic
API change detection: Compare with future recordings
The traffic capture successfully recorded both the requests made to your application and the external API calls your application made to SpaceX and Numbers APIs!ls proxymock
...
recorded-2025-07-30_15-31-43.701537Z
To inspect a specific request, ask:
"Show me the contents of the first recorded request"
Your AI assistant will display the request and response details like this:
📄 First Recorded Request
Here's the complete contents of the first recorded request:
File: proxymock/recorded-2025-01-27_12-05-00/localhost/2025-08-04_17-29-15.74063Z.md

### REQUEST (TEST) ###
GET http://localhost:8080/ HTTP/1.1
Accept: */*
Accept-Encoding: gzip
Host: localhost
Proxy-Connection: Keep-Alive
User-Agent: curl/8.7.1

### RESPONSE
Content-Type: application/json
Date: Mon, 04 Aug 2025 17:29:15 GMT
Step 4: Run mock server and tests
Ask your AI assistant:
"Run a mock server using proxymock and start my application with the correct environment varaibles"
Your demo app will now start using the local mock server.
When running a mock server your app no longer requires access to backend systems. The app will talk locally to proxymock instead of outside APIs.
To run tests against your app, ask:
"Replay the recorded traffic against my app with the proxymock mock server running"
Your AI assistant will run the proxymock server, your app and a regression test. The incoming regression test will run the same requests that were observed in step 1. In other words, inbouned requests now become regression tests that can be used for comparison. Your AI assistant may produce findings like this:
✅ Key Findings:
No breaking changes detected - All response bodies match exactly
No functional differences - All API responses are identical
Only timestamp differences - Expected behavior for date headers
All endpoints working - Your application handled all requests correctly