Installation
proxymock does some pretty heavy duty work all from the command line. Using the cli, you can automate the creation of simulation environments, record new traffic, modify transactions and replay.
Install proxymock via Command Line
- macOS
- Linux
- Windows
- Binary
Install with Homebrew:
brew install speedscale/tap/proxymock
You can also manually run the install script (don't do this if your ran brew install):
sh -c "$(curl -Lfs https://downloads.speedscale.com/proxymock/install-proxymock)"
Optionally, install a specific version by passing it to the install script:
sh -c "$(curl -Lfs https://downloads.speedscale.com/proxymock/install-proxymock)" -s v2.3.456
Run the install script:
sh -c "$(curl -Lfs https://downloads.speedscale.com/proxymock/install-proxymock)"
Optionally, install a specific version by passing it to the install script:
sh -c "$(curl -Lfs https://downloads.speedscale.com/proxymock/install-proxymock)" -s v2.3.456
proxymock.exe is capable of running all standard features natively on a Windows machine. Alternatively, you may use the linux proxymock binary via WSL.
Open PowerShell and create a Speedscale directory:
mkdir -f $env:userprofile\.speedscale
Download proxymock into the Speedscale directory:
curl.exe -L "https://downloads.speedscale.com/proxymock/proxymock.exe" -o $env:userprofile\.speedscale\proxymock.exe
If this is your first time using proxymock you may need to add the Speedscale directory to your Path environment variable so it is accessible without knowing the full path.
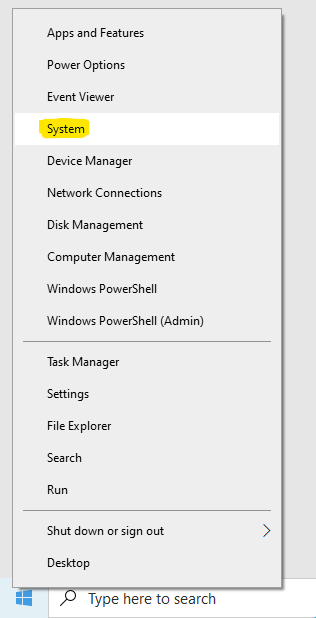
To add the Speedscale directory to your path, right click on the Windows button and click System.
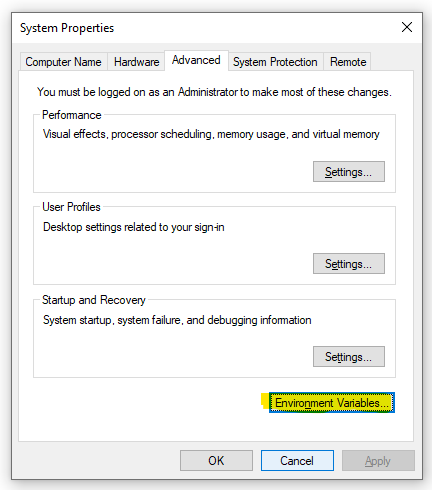
Click Advanced system settings on the right.

Click Environment Variables.
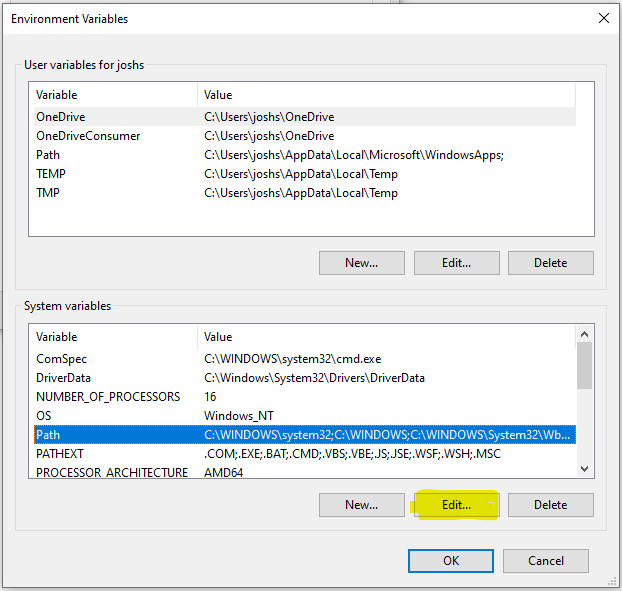
Under System variables select Path and click Edit.
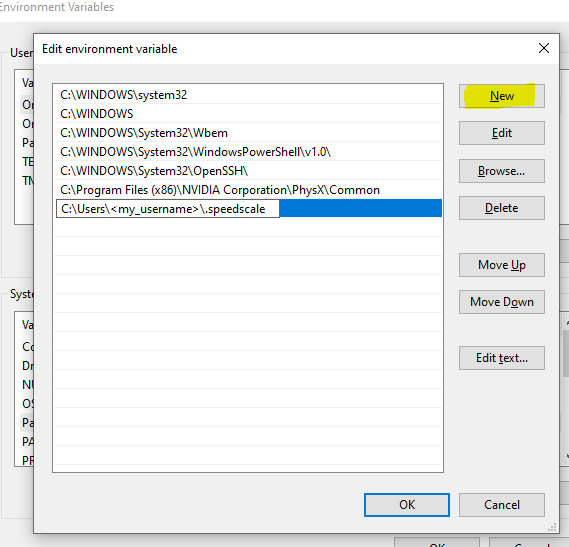
Create a New entry in the list with the Speedscale directory. If you are unsure of the exact path run this command from PowerShell.
echo $env:userprofile\.speedscale
Click OK and restart PowerShell.
Some of us are control freaks, or just hackers who like to mess with all of the knobs and switches. You can download the proxymock binary directly if that's your jam.
- MacOS
- Linux
- Windows
curl "https://downloads.speedscale.com/proxymock/proxymock-darwin-$(case $(uname -m) in x86_64) echo 'amd64';; arm | arm64 | aarch64) echo 'arm64';; esac)" -o proxymock
curl "https://downloads.speedscale.com/proxymock/proxymock-linux-$(case $(uname -m) in x86_64) echo 'amd64';; arm | arm64 | aarch64) echo 'arm64';; esac)" -o proxymock
proxymock.exe is capable of running all standard features natively on a Windows machine. Alternatively, you may use the linux proxymock binary via WSL.
curl.exe -L "https://downloads.speedscale.com/proxymock/proxymock.exe" -o $env:userprofile\.speedscale\proxymock.exe
Additional tasks associated usually assocated with standalone binaries, like permissions and $PATH, are up to you. If you're here we assume you know what you're doing.
Install the proxymock MCP by running proxymock mcp install.
After installing
Initialize once before your first recording. Browser sign-in is the default path:
- Run
proxymock initand use the browser sign-in flow. - Use
proxymock init --api-key <your key>only for CI or other headless environments.
For more options (enterprise profile, CI, troubleshooting), see Initialize API Key. Then continue with the Quickstart or use a language-specific first-success path:
- Java — Spring Boot demo, JVM proxy flags, and the exported production trace.
- .NET — Minimal API demo with HTTP_PROXY/HTTPS_PROXY and local replay.
- Node.js — Express demo with client-specific proxy handling guidance.
- Go — outerspace-go demo with Go-native record, mock, and replay steps.
- Python — Flask SpaceX demo with a lightweight Makefile-backed capture flow.