---
title: "MongoDB Mocking | Speedscale Docs"
description: "Mock MongoDB database connections and queries for local development using proxymock to record real MongoDB wire protocol traffic, and replay the recorded commands against a MongoDB server to load or regression test it."
canonical: "https://docs.speedscale.com/proxymock/databases/record/mongodb/"
---
[Documentation index](https://docs.speedscale.com/proxymock/llms.txt) | [Markdown](https://docs.speedscale.com/proxymock/databases/record/mongodb/index.md) | [Canonical page](https://docs.speedscale.com/proxymock/databases/record/mongodb/)
# MongoDB Mocking
This guide covers how to use proxymock to mock MongoDB database connections and queries for local development and testing.
## Introduction to MongoDB
MongoDB is one of the world's most popular NoSQL document databases, using a binary wire protocol (OP\_MSG) for client-server communication. **proxymock** is able to record and mock MongoDB databases. This allows you to mock a MongoDB database, including real data, without running a MongoDB instance or populating it with data. To do this, we record your app talking to a MongoDB database and simulate the database in subsequent tests. To learn more about proxymock recording and architecture, work through the [agent tutorial](https://docs.speedscale.com/proxymock/agent-tutorial/).
## When to use `--map`
Use `--map` when you can change the MongoDB connection address and want to avoid driver-specific proxy configuration. proxymock listens on a local port and forwards that connection to MongoDB.
HTTP proxy environment variables do not route MongoDB's wire protocol. SOCKS support depends on the driver and transport. The current Java Sync Driver has explicit `proxyHost` and `proxyPort` options; it ignores those options when using a Unix domain socket or configured `TransportSettings`. See [MongoDB's Java SOCKS5 guide](https://www.mongodb.com/docs/drivers/java/sync/current/security/socks/).
Do not assume JVM-wide SOCKS properties or `ALL_PROXY` configure your MongoDB driver. Use its documented options or the port-mapping example below. See [Java proxy configuration](https://docs.speedscale.com/proxymock/guides/java/) for the differences.
## Recording MongoDB Traffic
The `proxymock record` command creates RRPair files from real MongoDB interactions. Each request will contain a MongoDB wire protocol command (like a `find` or `insert`) and the response will contain the corresponding documents or acknowledgment returned by the database.
### Start the Recorder
Start a dedicated terminal window to run the proxymock recorder:
```bash
proxymock record --map 37017=localhost:27017
```
This tells the recorder to listen on port 37017 for MongoDB traffic and forward it to the real MongoDB server at 27017. Your can learn more about the how _proxymock_ records on the [architecture page](https://docs.speedscale.com/proxymock/how-it-works/architecture/).
### MongoDB Connection Configuration
For proxymock to capture MongoDB traffic, point your application at the mapped port. The exact mechanism depends on your language and framework.
**Java (Spring Boot)**
Externalize the MongoDB host and port so you can switch between the real and mapped ports without code changes. In `application.yml`:
```yaml
# application.yml
spring:
data:
mongodb:
host: ${MONGO_HOST:localhost}
port: ${MONGO_PORT:27017}
database: mydb
```
Then start your app pointing at the mapped port:
```bash
MONGO_HOST=localhost MONGO_PORT=37017 java -jar target/my-app.jar
```
**Node.js**
```bash
MONGO_URL=mongodb://localhost:37017/mydb node app.js
```
**Python**
```bash
MONGO_URL=mongodb://localhost:37017/mydb python app.py
```
The key ingredient is redirecting your application's MongoDB connection to `localhost:37017` so traffic flows through the proxymock recorder via `--map`.
### What Gets Recorded
You can browse the recording in your browser with proxymock web:
```bash
proxymock web
```
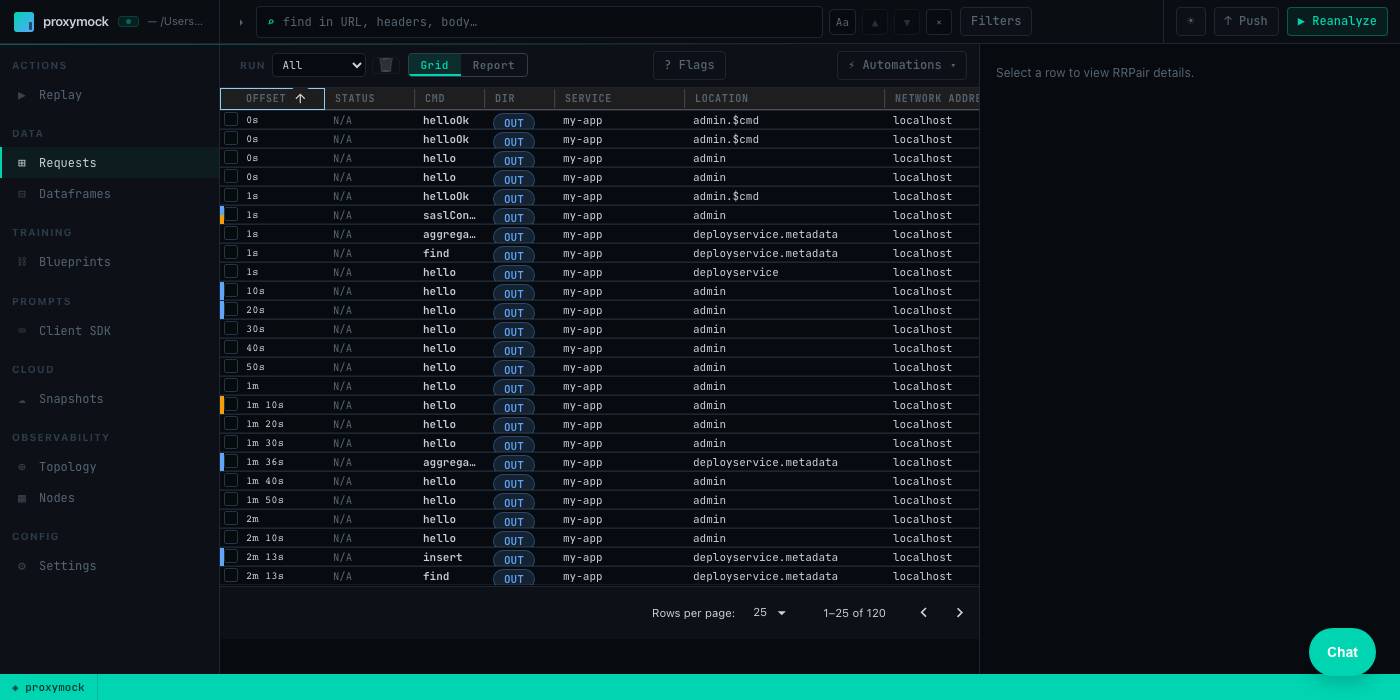
proxymock captures MongoDB wire protocol traffic as RRPair files containing:
* **Request Data**: MongoDB commands — `hello`/`isMaster` handshake, SASL authentication (SCRAM-SHA-1/256), `find`, `insert`, `update`, `delete`, `aggregate`, `getMore`, and others
* **Response Data**: Document results, cursor data, write acknowledgments, error responses
* **Timing Information**: Command execution times and connection latency
The actual wire protocol is binary but proxymock displays request and response data as JSON. The underlying files can be modified if you want your mock to return different values. You can learn more about the structure of the underlying recording by looking at the `proxymock` directory containing the recording files and the [docs](https://docs.speedscale.com/proxymock/how-it-works/rrpair-format/).
### Troubleshooting Recording
* If SOCKS settings have no effect, check your driver version and transport, or use `--map`.
* Python/Node.js drivers have inconsistent SOCKS support — `--map` is simpler and more reliable across all languages
* Verify MongoDB server is accessible from proxymock
* If using authentication, make sure to exercise the full connection lifecycle so the SCRAM handshake is captured
## Starting the Mock Server
Make sure to stop your local MongoDB server to prevent port conflicts. You can run your app against the normal MongoDB port 27017 now and proxymock will simulate the database.
Start the _proxymock_ mock server:
```bash
proxymock mock
```
You can now run your MongoDB client normally and it will connect to proxymock on port 27017 like a normal database.
tip
If the mock server fails to start or your app times out connecting, verify that the recorded RRPairs include the MongoDB handshake (`hello` or `isMaster` command). Without the handshake, the driver cannot establish a connection to the mock.
## Modifying Responses
To change a response by hand, edit its RRPair markdown file. To change values on every run, save the transforms in a [blueprint](https://docs.speedscale.com/proxymock/guides/blueprints/) instead. Active blueprints in the workspace apply during `proxymock mock` and `proxymock replay` without rewriting the recording. They use the same [transform engine](https://docs.speedscale.com/concepts/transforms/) as Speedscale Cloud, so you do not need to upload the snapshot.
[Create and Verify Blueprints](https://docs.speedscale.com/proxymock/guides/blueprints/) shows how to save transforms from `proxymock web`, preview their changes, and confirm they ran. Use a responder response chain to change the mock response returned to your app, or a responder request chain to change the request used for mock matching.
If your team already keeps a Traffic Transform Template in Speedscale Cloud, pull it into the workspace:
```sh
proxymock cloud pull transform
```
The template is written to `proxymock/blueprints/.json`, and the next `proxymock mock` applies it.
## Load and Regression Testing
The commands you recorded can also be replayed against a real MongoDB server, to load test it or to catch regressions after an upgrade, such as MongoDB 7.0 to 8.0, or a move to another server that speaks the MongoDB protocol. Select the MongoDB traffic as the tests and point the replay at the server:
```bash
proxymock replay \
--tests-filter '(direction IS OUT) AND (tech IS MongoDB)' \
--test-against mongodb://localhost:27017/admin \
--test-config mongo-replay
```
The replay user, with a SCRAM password or an X.509 certificate, goes in `generator.mongodb` of the test config, never in the address. The replay maps the recorded cursors and sessions onto live ones, so `getMore` paging and transactions replay. It skips the handshake, authentication, change streams and tailable cursors.
warning
The replay writes to the server it targets, so point it at a disposable database. The recorded `_id`s are sent again on every pass, so a second pass or a second virtual user fails its inserts with duplicate key errors unless the database is restored first.
See [Load and Regression Test a Database](https://docs.speedscale.com/proxymock/databases/load-and-regression-testing/) for credentials, TLS, scoring and limits.
## Kubernetes and eBPF
In Kubernetes environments, Speedscale's eBPF collector (`nettap`) captures MongoDB traffic automatically at the kernel level — no `--map` configuration, SOCKS proxying, or application changes required. The collector uses kprobes and uprobes to observe TCP and TLS traffic directly, including MongoDB's binary wire protocol.
This means the `--map` workflow described above applies to **local development** only. When your application is deployed in Kubernetes with the Speedscale operator, MongoDB traffic is captured transparently alongside all other protocols.
For details on eBPF-based traffic collection, see the [eBPF Traffic Collection](https://docs.speedscale.com/reference/ebpf-traffic-collection/) documentation.